After hours of minimal success at trying to setup LTTKGP on AWS, I've decided to start over from scratch, with a tiny app and blog my experiments.
Warning: This is my first time using AWS beyond just plain old EC2 and S3 and I apologise for any mistakes. Also, this might get really long. you've been warned :)
Prelude
Last summer, I started working on LTTKGP with a bunch of awesome people. LTTKGP fetches songs posted on the FB Group Listen To This KGP, collects metadata, organizes them into feeds, and has a pretty cool webplayer that lets user play these collections. The project is open source and code can be found on the GitHub org.
LTTKGP has a couple of components, and we use AWS to deploy 2 major services
- R2-D2: This is the “Facebook connector” that polls the Facebook group at a pre-defined interval and persists the Graph API response in a No-SQL database. This data is then sent one at a time to C-3PO. The NoSQL database of choice is Amazon AWS’s DynamoDB
- C-3PO: The central API server powering the website. C-3PO builds on top of the above projects by listening to new posts coming in from R2-D2, fetching metadata, and storing in a relational database. The website essentially make calls to C-3PO to fetch data and then C-3PO checks its databases, filters and returns songs in a specific format. The database of choice is PostgresQL on AWS RDS
The other major service is Falcon, the beautiful UI that brings it all together. Falcon is deployed on Netlify and we use Cloudflare to manage DNS for the entire project
Existing AWS Infrastructure
To deploy LTTKGP, Naresh came up with a pretty cool architecture (and daunting looking :P) which we've been using to deploy, for a couple of months now
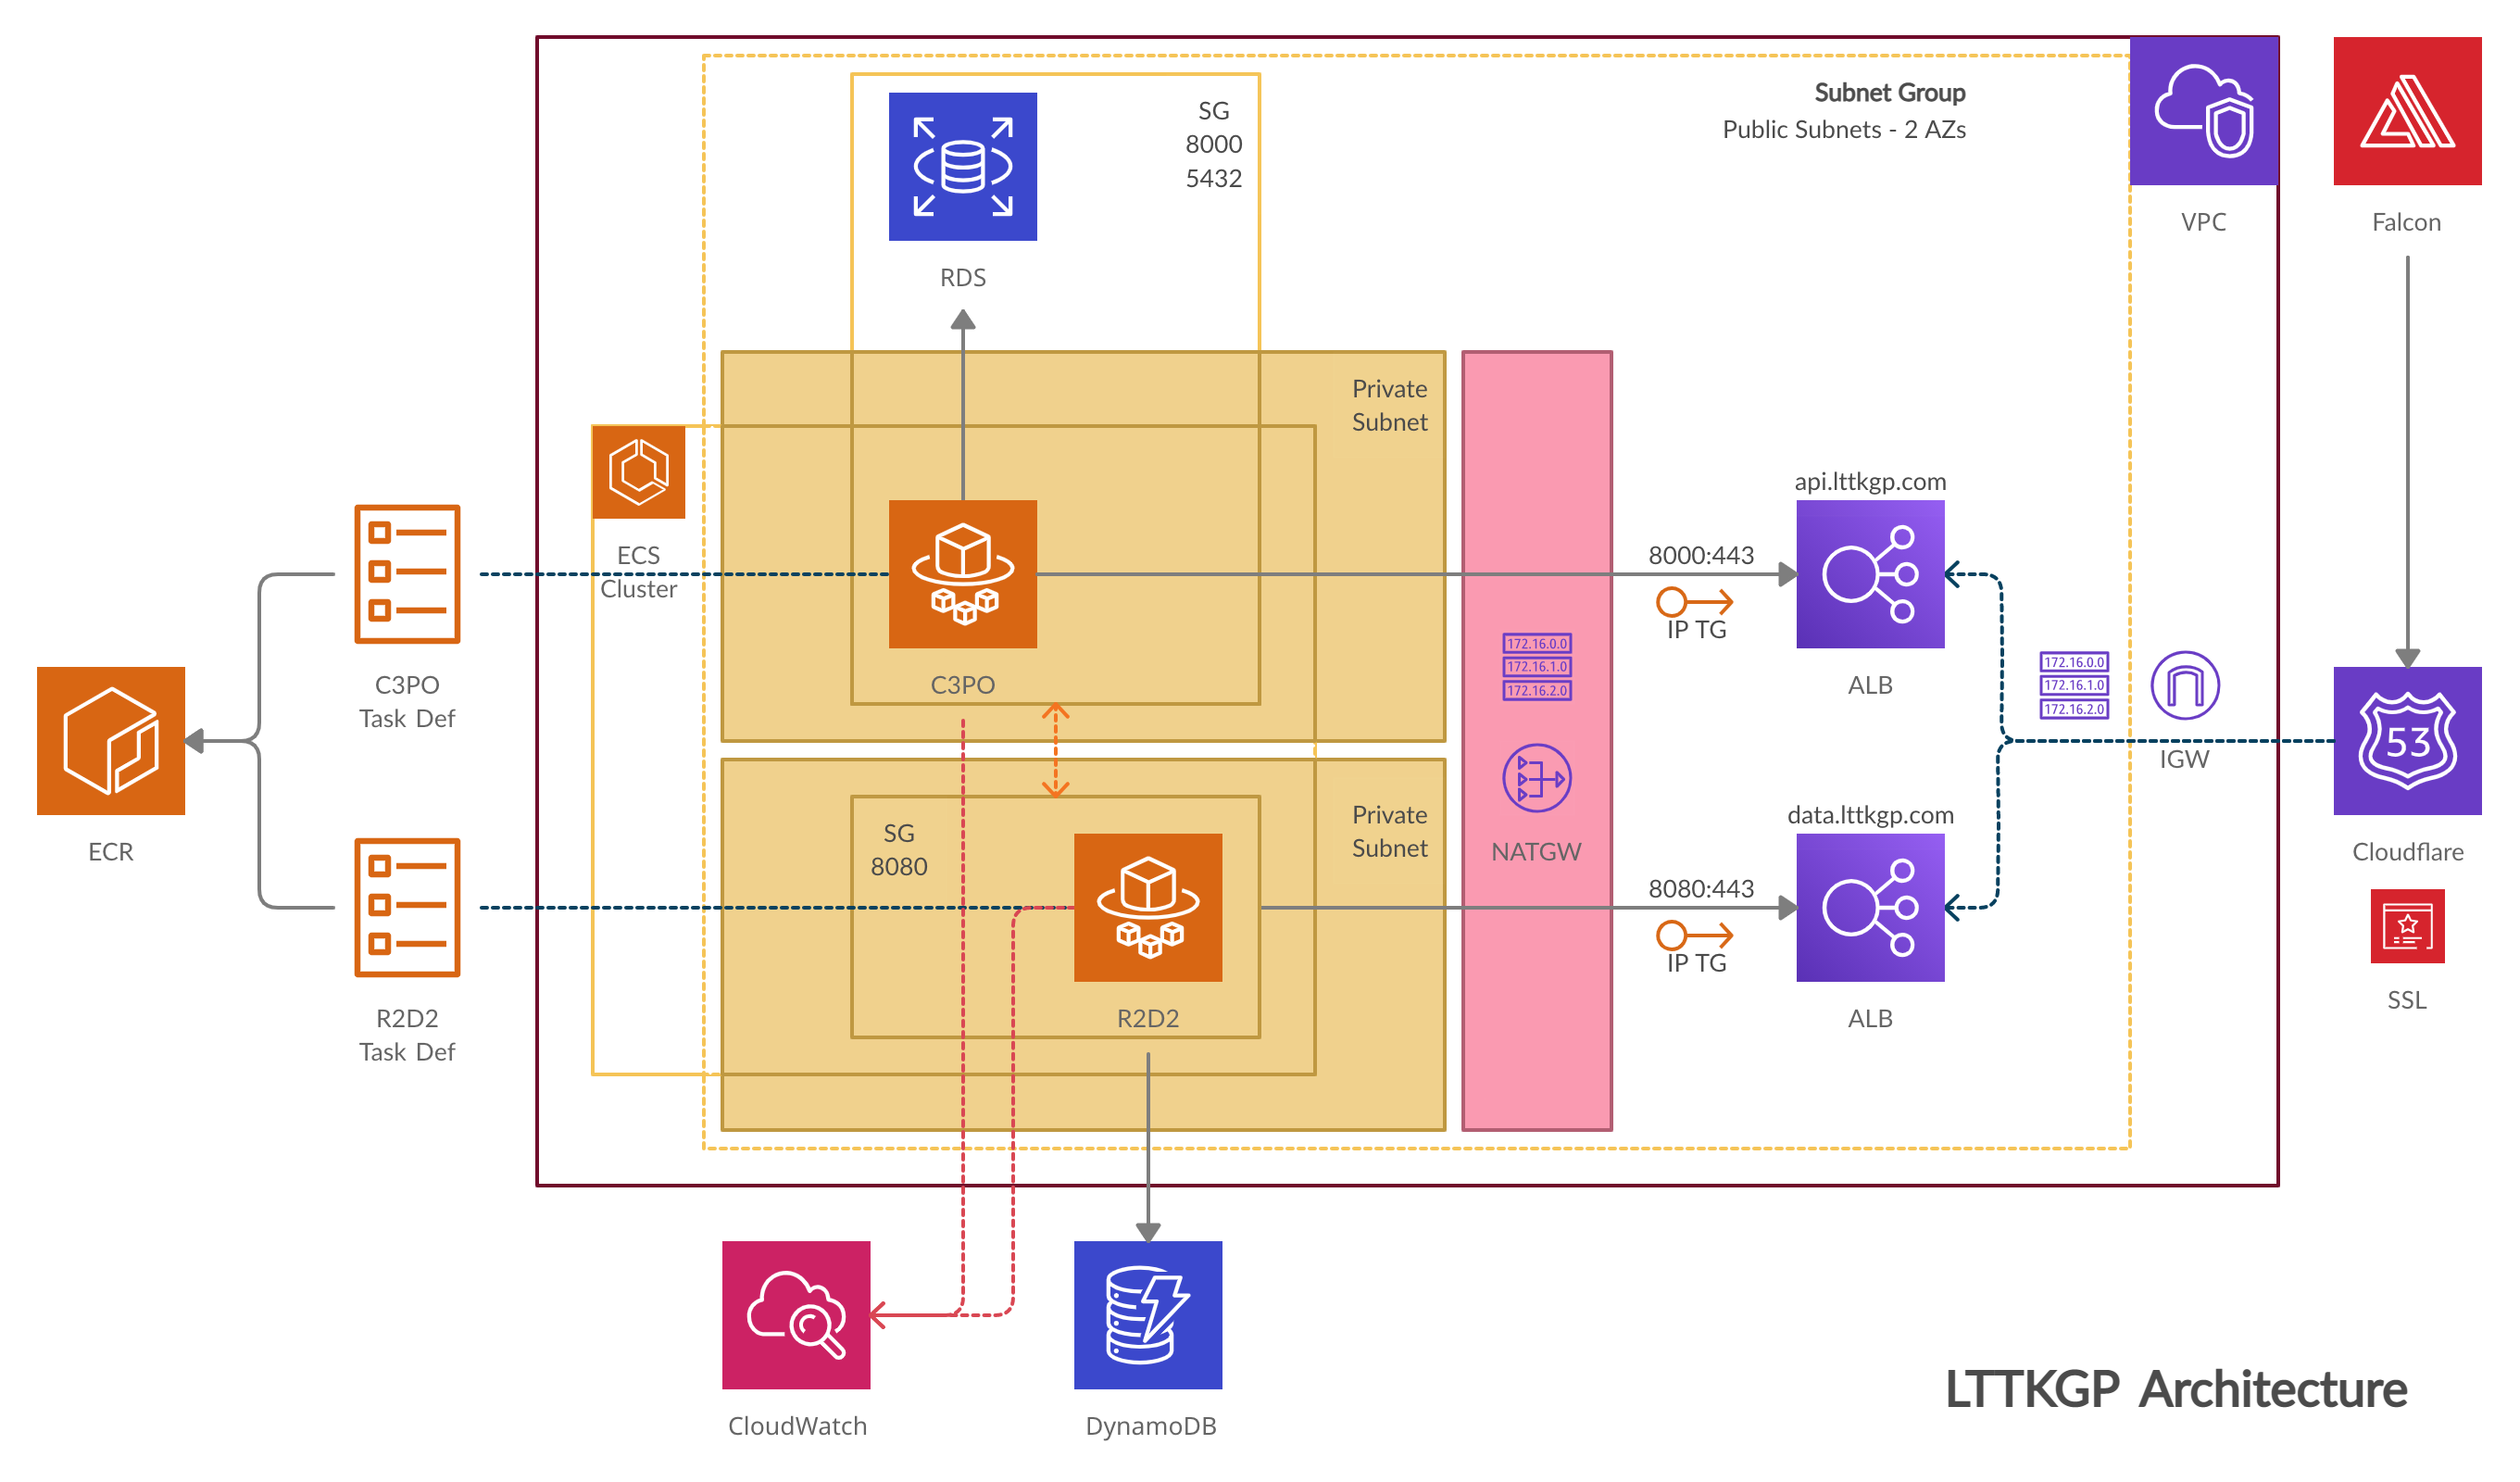
A top level overview is as follows:
- All resources lie inside our VPC, which is the big container.
- There are 2 databases -> DynamoDB, a NoSQL database that stores raw FB posts when R2-D2 fetches them and a Postgres RDS instance to store posts after C-3PO processes them.
- We upload docker images for both C-3PO and R2-D2 to ECR and create task definitions using those images. Task definitions are essentially recipes for the actual services that will run those containers.
- Both C-3PO and R2-D2 have their private and public subnets. The ECS services run inside the private subnets. Security groups control which ports are exposed in each of the subnets, and ensure that private subnets can be accessed only by resources inside of the VPC (and have proper access)
- The Application Load Balancers (ALBs) redirect traffic from the outisde world to C-3PO and R2-D2. We need a NAT Gateway since both services are inside their private subnets and can't access/be accessed on the internet. This also means that routing tables and target groups have to be configured, using the EC2 dashboard
(When this was set up, all I did was stare at the screen in constant awe!)
The major issue with the present infra is that it's pretty expensive mainly because of the NAT Gateway and using Fargate to manage instances, instead of self managing EC2 instances.
Mirroring Existing Infra
Since we could make do without private subnets, by having tighter rules in our security groups, I attempted to replicate the present infra on my personal AWS account and mess around with it till I can get it working again.
The first thing I did was exactly replicate the infra we were using. It took me a couple hours but I set it up and can be accessed at:
- C-3PO: https://api.metamehta.in/
- R2-D2: https://data.metamehta.in/
- Falcon: https://musik.metamehta.in/
Experiments!
I found a couple of cool Medium blogs (One, Two) that descibe how to deploy to ECS using self-hosted EC2 instances but I wasn't able to get C-3PO up and running. I've now decided to start from scratch, with a simple Flask app
Starting from Scratch - Part 1
The first step is creating a new VPC for our use.
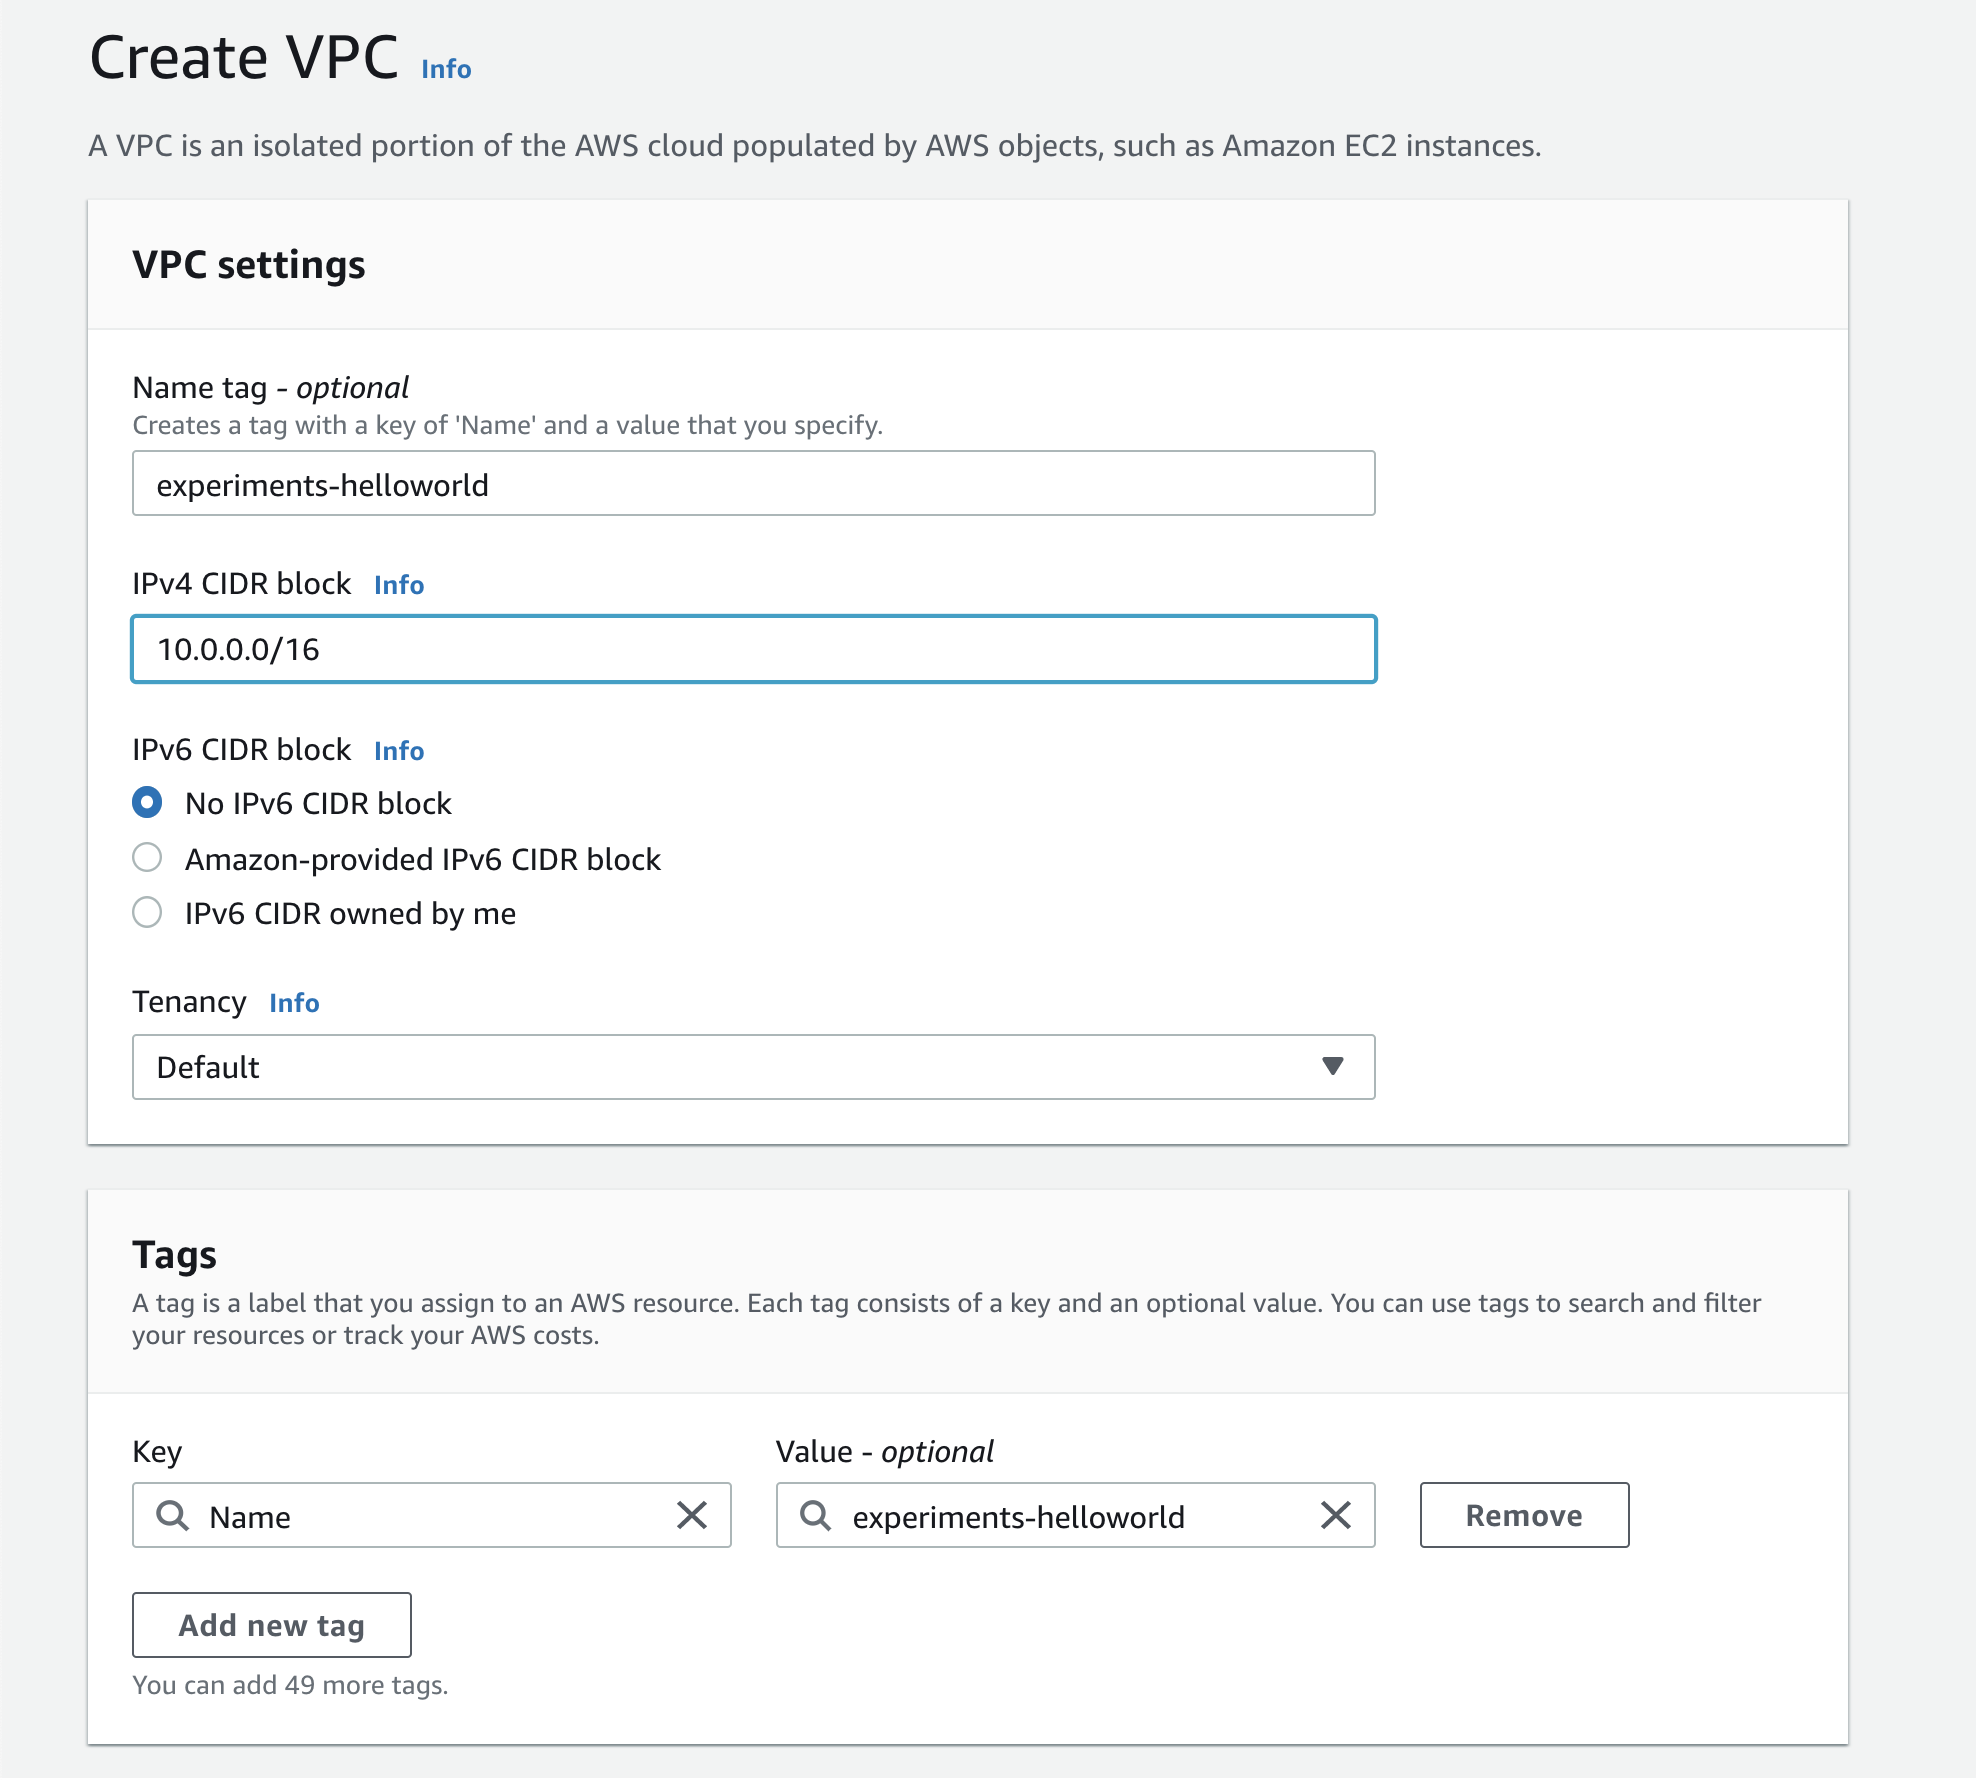
I'll create 2 new subnets inside the VPC. To use a elastic load balancer, we'll need atleast 2 subnets in different availability zones:
- helloworld-public-1: CIDR 10.0.2.0/24 in ap-south-1a
- Helloworld-public-2: CIDR 10.0.4.0/24 in ap-south-1b
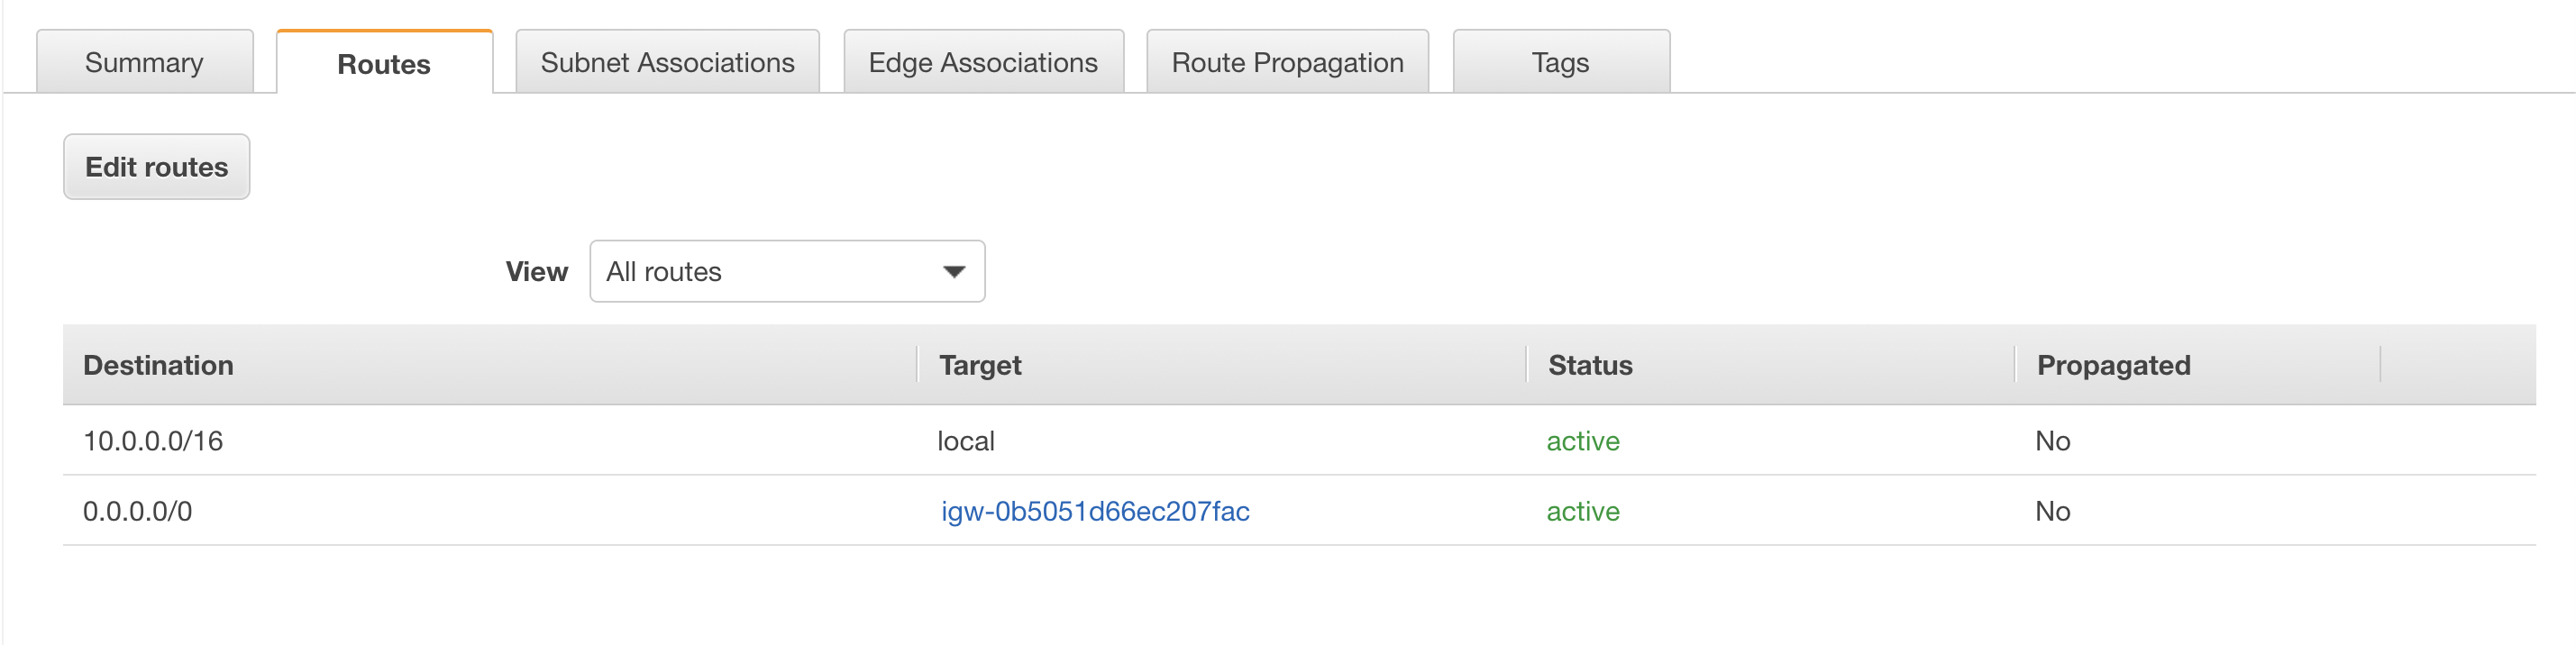
I also create a route table, with both of these subnets and a internet gateway that is attached to our VPC. Next, I'll setup a new flask application, dockerize it and create an ECS cluster.
NOTE: In your routing table, add a route from 0.0.0.0/0 to the above configured internet gateway. I didn't and it took me some time to figure it out
Creating our test Flask app
To begin, I'll use a simple hello world app. I'll keep iterating if I'm able to successfully deploy this first
Here's the repository: https://github.com/mukul-mehta/Flask-ECS-Adventures
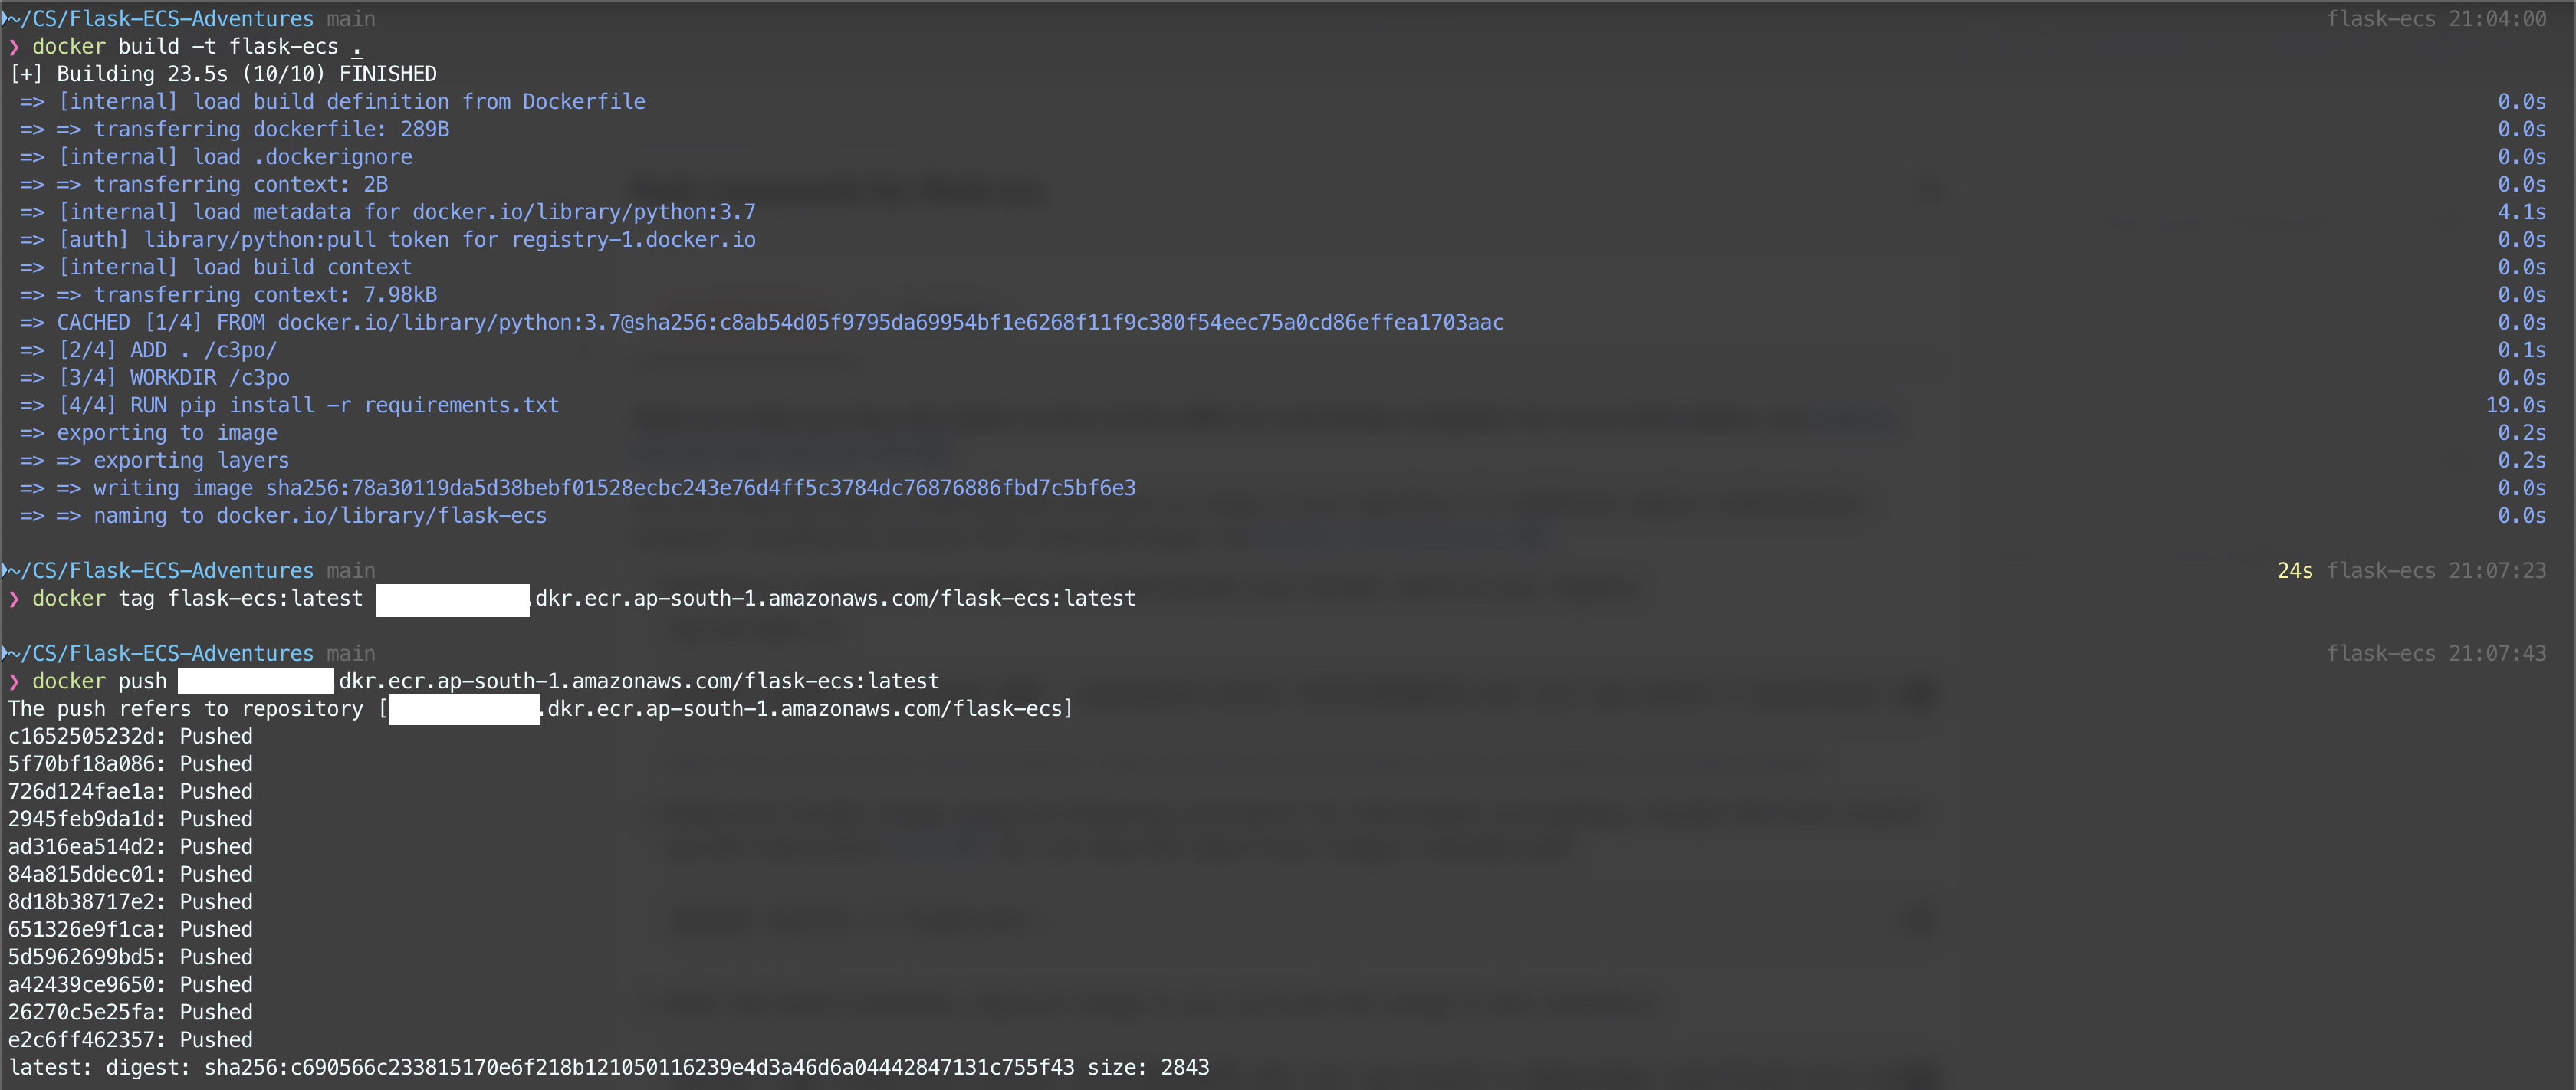
Step 1: Pushing the image to ECR
I've created a new private repository on AWS ECR called flask-ecs, to which I'll push my image. Once I'm done logging in, I build, tag and then push the image to the repository
Step 2: Create an empty ECS cluster
This should be simple hopefully. Go to ECS, create a new cluster and select template as EC2 Linux + Networking, give it a name and choose empty cluster on the next page
Step 3: Create a launch template for EC2 instances
This is where it started to get tricky for me. Do I need to setup a launch template and a autoscaling group, or can I do with just creating an instance for now :confused:
Let's try creating a launch template for now.
Since we need an instance for ECS, we'll choose a community AMI that it optimized for ECS. The latest one can be found here. The AMI comes with a 30GB root volume by default, and I don't think I'll add more storage for now. I don't specify an instance type in the launch template either. To add this instance to our ECS cluster, I add the following in user data (Advanced -> User data)
#!/bin/bash
echo ECS_CLUSTER=your_cluster_name >> /etc/ecs/ecs.config
I'll create just one instance for now. a t2.micro using the above launch template. I select the subnet as helloworld-public-1 and use the default security group for now. I also need to create a new IAM Role for the instance, as mentioned in this guide. The new IAM role has the follwing permissions:
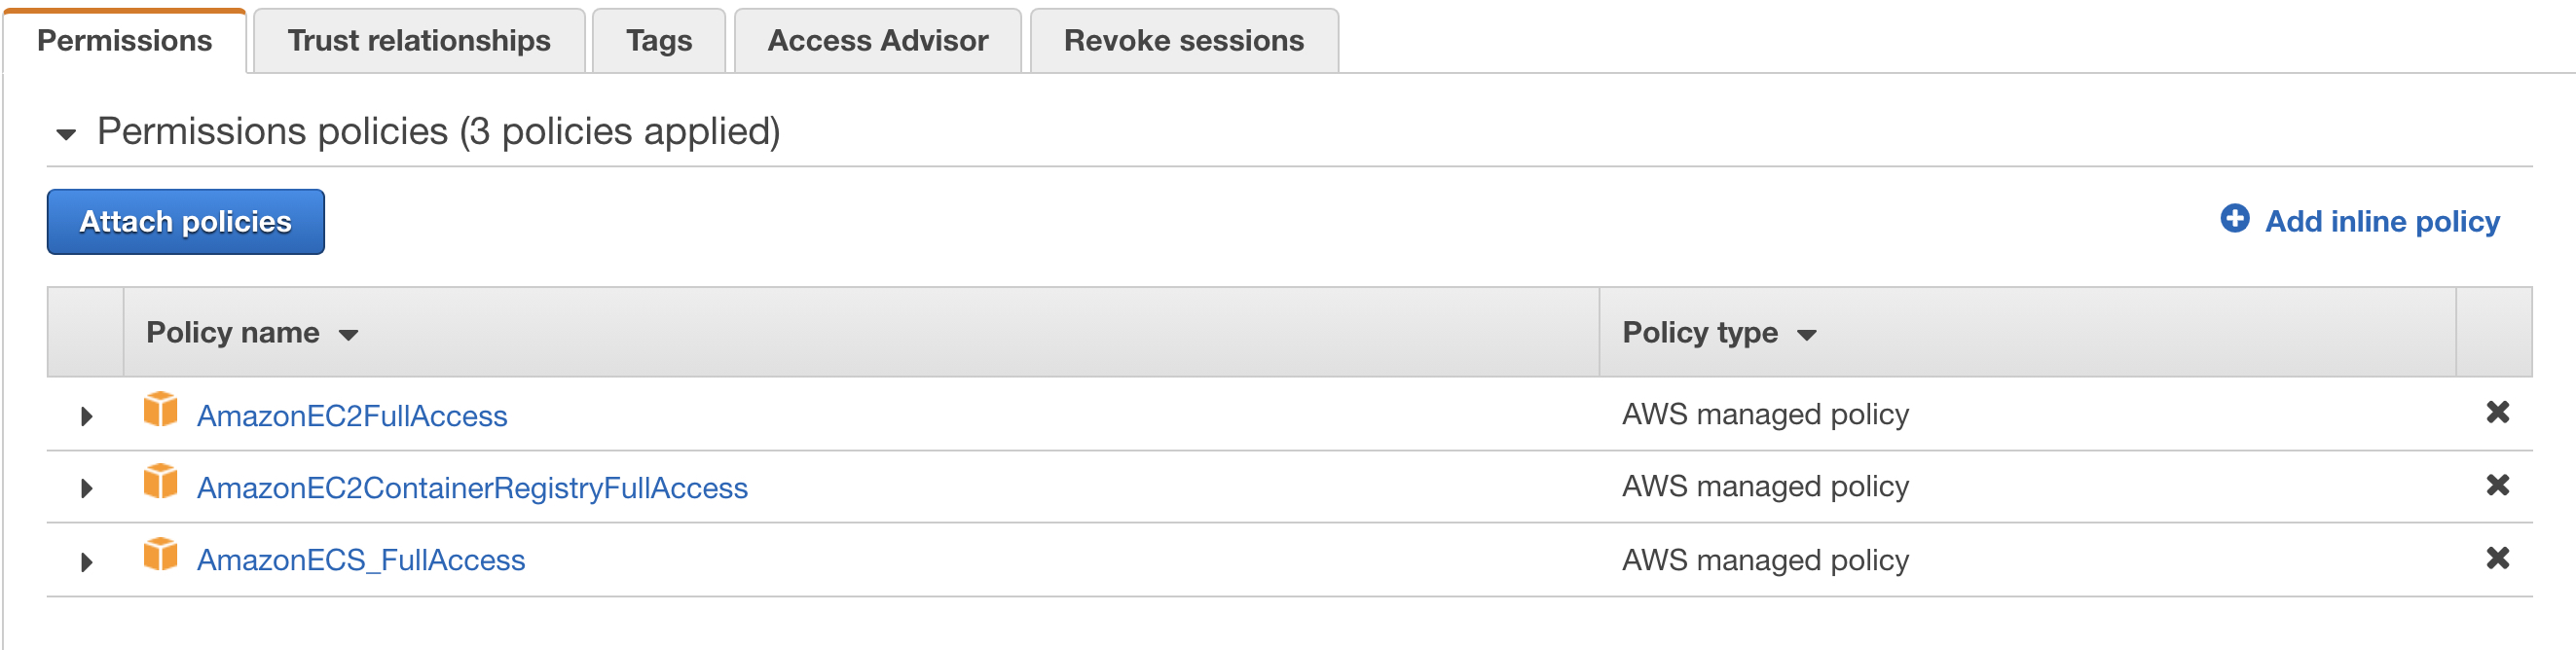
Now, we have a t2.micro EC2 instance, running an Amazon Linux AMI that is optimized for ECS, with our custom IAM role and user data. We should now this instance attached to our ECS cluster :crossed_fingers:
IT DIDN'T WORK :neutral_face:
Okay, gotta do this all over again. I need to create an EC2 instance and make sure that it's attached to the ECS cluster. Why is this so hard :disappointed:
AWS's documentation says that the correct IAM role to use is called ecsInstanceRole. There isn't a profile with that name on my dashboard, let me create one using the instructions mentioned here.
Okay, this was my fault. Turns out I forgot to add a route in my routing table for this VPC. In order to use ECS, the instances need to have a route to reach the ECS service endpoints. For this, I need to add a route in my routing table, that routes to my internet gateway. Doing this fixed the problem and I can now see the EC2 instance in my ECS cluster
Step 4: Create a new service in the ECS cluster
4.1: Create a new task definition
Before this, I need to setup a task definition. The task definition is a recipe for the service and specifies the image and hardware requirements for the task.
In the task definition, I specify the URI of the container image (Which I pushed to ECR), a memory limit of 512MB and 512 CPU Units (Each CPU core is 1024 CPU units). I also need to add a port mapping, from 8000 in host to 8000 in the container, since my flask app is listening on port 8000 inside the container.
Once we're done with creating with task definition, I need to create a service using this task definition
4.2: Create a new load balancer
Before I can create a new service, I need to setup an Application Load Balancer and a Target Group. For now, I'll setup a listener on port 80 instead of configuring a new certificate and setting up a HTTPS listener.
Setting up the ALB should be fairly straightforward. Add a listener on port 80, for HTTP traffic, select the right VPC and subnets and the default security group. Then, setup a new target group that is listening on port 80 and protocol set to HTTP1. On our simple flask app, I setup a health check endpoint /health that on success returns a status code of 200. We need a health check endpoint since the target group needs to know when a target is down. It sends requests to this health check endpoint every couple (5 AFAIK) minutes and if there are 2 consecutive failures (status code != 200), it marks a target as unhealthy. I don't register any targets right now, since we'll do that when we setup our service
Now that the ALB is setup, I'll go back to creating a new service
4.3: Creating a service
Since we're using self-managed EC2 instances, the type of service is EC2. I set the number of tasks to 1. Next, we add the above configured ALB to our service and add the container as a target. For now, I use a very simple autoscaling policy, with minimum tasks set to 1, desired tasks set to 1 and maximum number of tasks as 2, which runs when average CPU utilization for our task crosses 65% I'm sure this won't trigger given our very simple app but nevertheless, we're done!
Step 5: Yaaaay, we have a basic app up and running!
Now that we have our service created, it should've started a task (Which is a running instance of that service). I see a running task :)
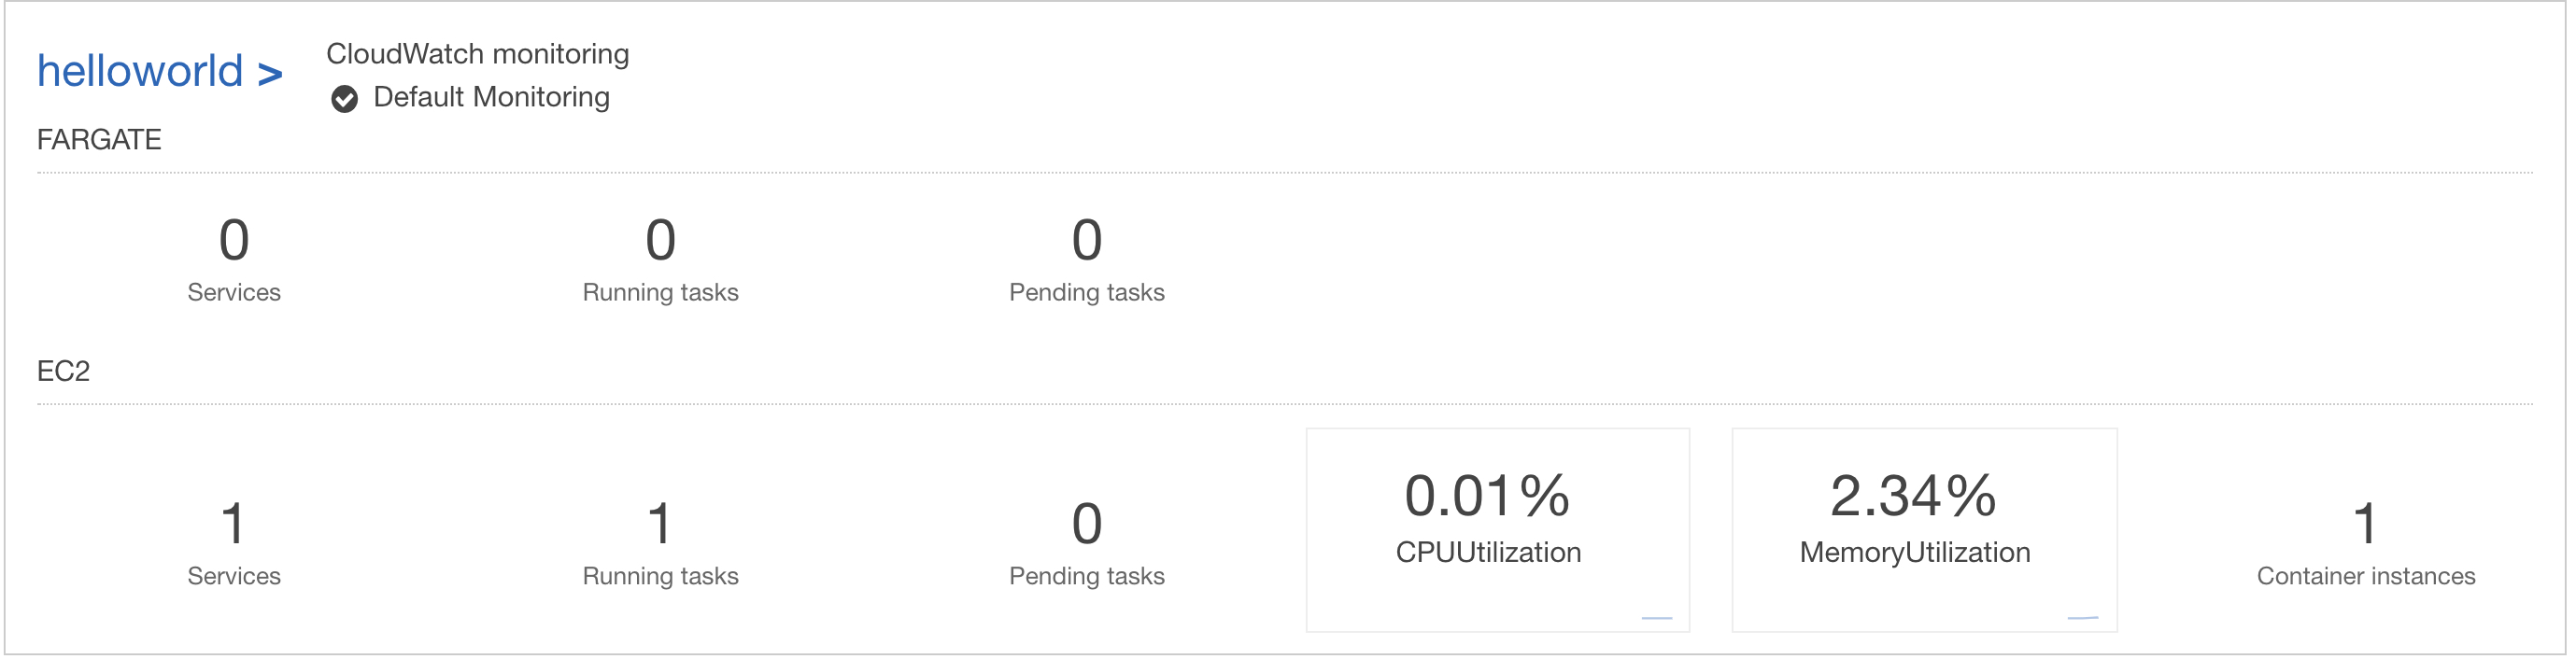
(As expected, CPU utilization is extremely low)
Since our ALB is internet facing, we should be able to access it directly and it should work and it does! Here's the link: http://experiments-helloworld-alb-1556701883.ap-south-1.elb.amazonaws.com
To finish setting up our basic app, I'll just provision a new certificate via Certificate Manager in order to use HTTPS. This would involve adding a new CNAME record. Next, I add a listener to the ALB, listening on 443 and forwarding to our target group. Once this is done, I'll create a CNAME record for hello.metamehta.in pointing to the ALB.
Cool, so we now have our flask application running at https://hello.metamehta.in
Woohoo! So we're done with one milestone! The next job is setting up LTTKGP, instead of our dummy application. We still need to configure a ton of stuff, security groups for example, since for now our default security group allows traffic on all ports which seems like a horrible thing to do